Descending Energy Ball Bounce
This is also known as entropy. An excellent word to use at a party as in, “The entropy of this party has accelerated dramatically, let’s get outta here.” Or when you’re talking with someone really boring but you don’t want to insult them, just say, “The entropy of this conversation is intriguing to say the least.” Or impress your parents before you go to bed, “My entropy necessitates my bidding you good-night.”
Everything is subject to descending energy. To a certain extent, the slo-in and slo-out principles are a form of descending energy as well.
Assignment
This assignment will require you to animate a bouncing ball as though it were real, meaning subject to the force of gravity. It will bounce several times, each bounce being less and less until the ball comes to a complete stop.
Purpose and Principles Involved
The purpose of this assignment is to move to the next level and animate something real. To deal with timing and creating an illusion of weight, gravity and loss of energy.
These are the new principles involved:
• Descending Energy
• The Effect of Gravity
• Realistic Timing
• Use of Arcs
These are the principles being re-enforced:
• Stretch
• Squash
• Weight
• Slo-in and slo-out
• Spatial Relationships
• Accuracy in Drawing
• Reading and Following a Timing Chart
• Maintaining Volume and Proportions
• Flipping Your Drawings
The principles listed above are the Primary principles of animation. All animation is based on these. It is important to your training that you get these firmly established in your mind now rather than later. Six of the next seven assignments will deal exclusively with these basic principles in order to help you fully understand their use in animation. If you “get it” within the next couple of assignments, don’t skip ahead to a more complex assignment. Treat each assignment as a stepping stone that builds your knowledge. Skipping stones will leave a void in that area that you can pick up on later, but it’s good to go through it anyway.
We’ll deal with the secondary principles soon enough, don’t worry.
Thought Process
Once again, begin by actually bouncing a ball on a hard surface. Observe the effect of gravity upon the ball and how it causes it to slow it’s upward movement and then draws it back down to the ground.
Time the bounce. Get a feel for how long it is in the air for between the bounces. This time observe the ball suffering from descending energy as each bounce gets smaller and smaller. Depending on the size of the ball and the consistency of it’s physical make up, a larger ball will tend to bounce more times before coming to a stop. If the ball is filled with air, it will tend to bounce more times than if it is solid. For example: a basketball will bounce an average of 10 - 12 times before coming to a stop. A ping- pong ball will tend to bounce about 20 times. A child’s rubber ball will bounce around 8 - 10 times. A small Indian rubber ball will bounce about 25 - 30 times.
Remember, with animation the longer you want something to continue moving, the more drawings you will have to do. For this assignment, 8 bounces should be sufficient.
Take a sheet of animation paper and place it on your disk, over top of a field guide. With a light blue pencil, trace off the 10 field area. This will indicate your working area for the ball bounce. Do not go outside this area.
Draw a line along the horizontal 9 field south line. This will indicate the floor plane or contact point for the ball to bounce off of.
Starting at the left side of the line make a small horizontal mark around the 8 fld west line. This will be the first bounce point. Make another mark at the 5fld west line, the 2 fld west line, .5 fld east, 2.5 fld east, 4 fld east, 6 fld east, 7.5 fld east and a final one at the 9 fld east line. Each of these marks will now be the impact points for each of the bounces. The final mark will be a small roll to the stop position.
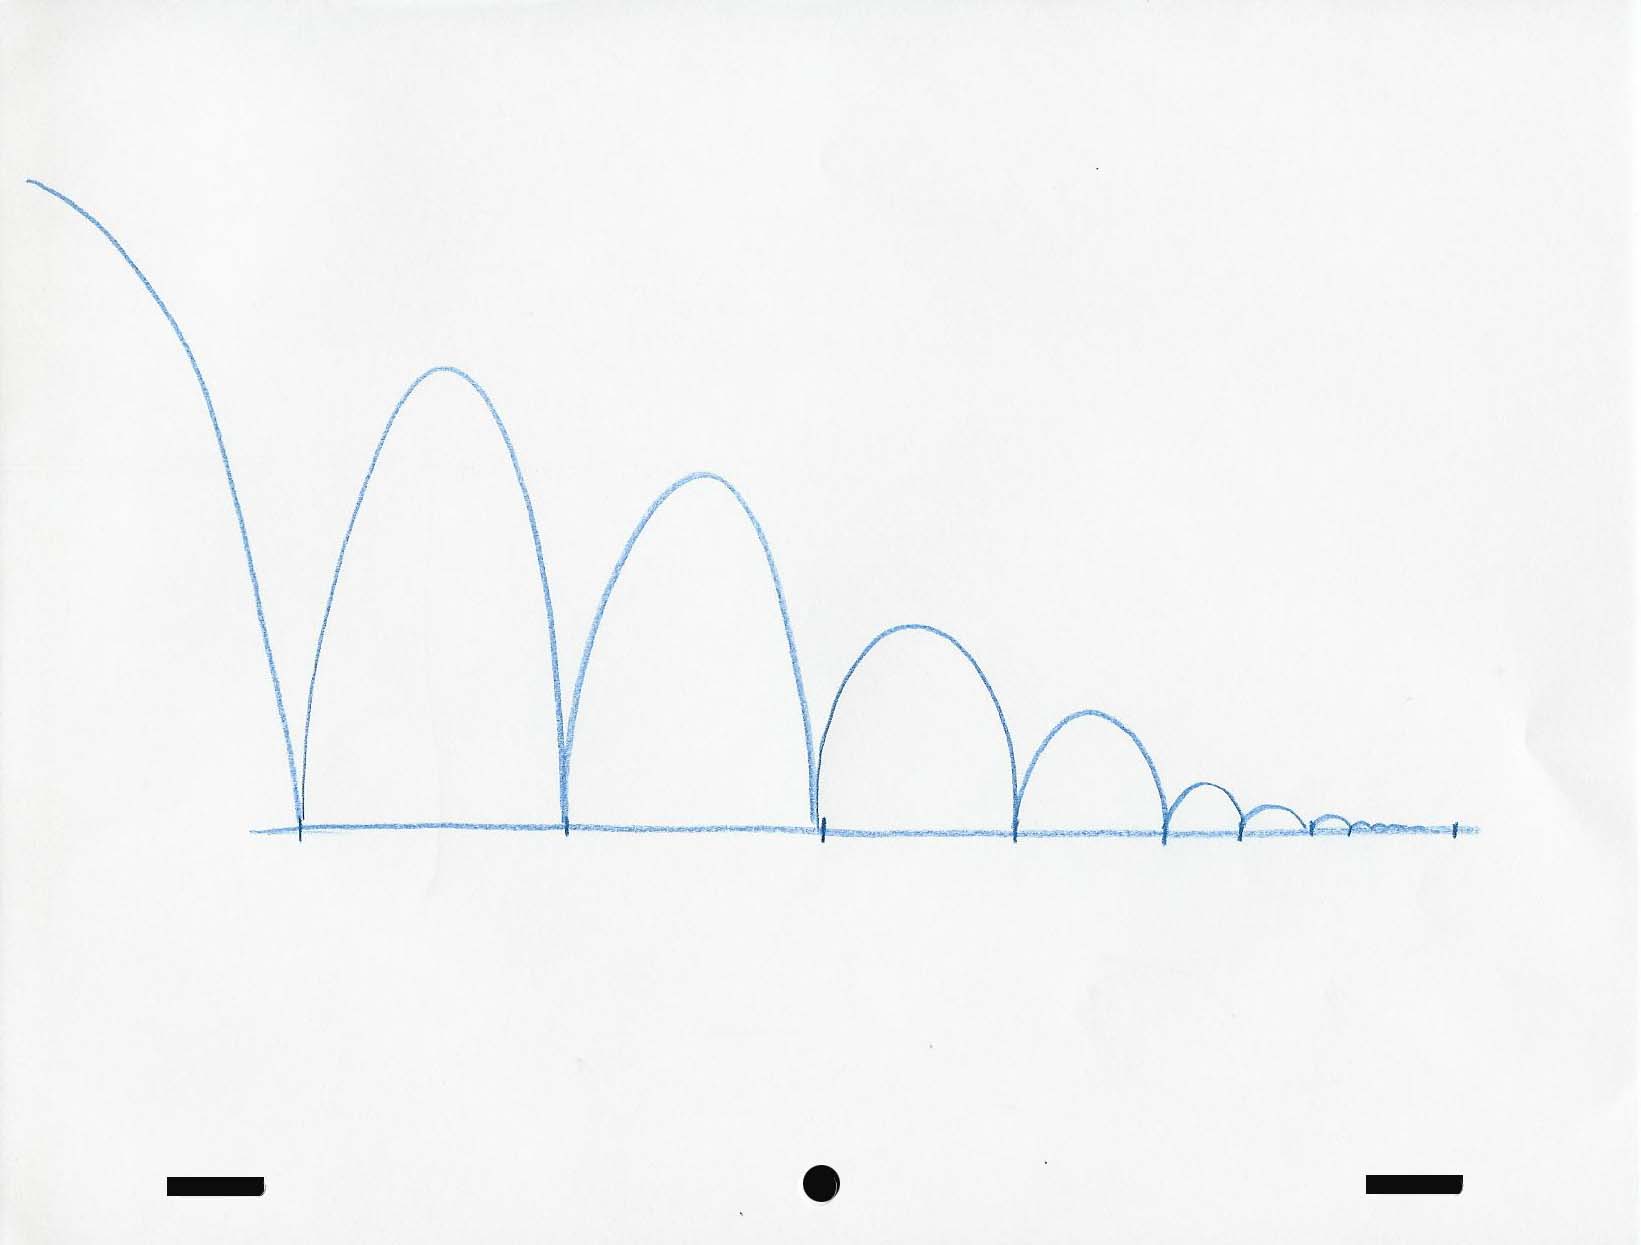
Here is what your paper should look like:

Next draw an arc for the path of action for each bounce. Each arc should get smaller as it moves to the right.
Here’s what it should look like:
Follow the same procedure as on the perpetual ball bounce assignment for timing the ball’s movement but here, place the timing on the arcs.
There should be a key at the low point (a squashed pose) and a key at the high point (the ball round and normal).

Now, you want to do your timing for the upwards movement and the timing for the downwards movement.
Do it just the same as you did on the perpetual ball bounce.

The first two bounces could remain the same, but the third bounce should lose a drawing, the fourth could stay the same as the third. The fifth would lose a drawing, the sixth another drawing, the seventh a drawing and the eighth one more.
So, The first two bounces will have 10 drawings each (11 is like #1 on the first bounce), the next two, three and four will have 9 drawings each and then each bounce after that will lose one. Here, I’ll show you in chart form:

Here’s what it should look like:

Remember when you draw the key positions for the low (squashed) points that each one will be less and less squashed as the bounces get smaller as there is less force causing the ball to squash. I would suggest that 51 and 56 are not squashed at all.
You should note that I’ve made the arcs slightly higher for the sake of being able to show the timing lines. You should probably shorten the arcs a bit, otherwise it looks as though there should be one final bounce before the roll to a stop.
For the roll to a stop, draw a slo in chart from the impact position on drawing 56 to the final mark on your horizontal floor plane line. 6 drawings should do the trick. The final key pose would then be 62. This is the ball stopped.

Here’s what you can do. Number them all #1 then after the first #1 add an A to make it 1A. Then add a B to the second #1 to make it 1B, then 1C, 1D and finally the original #1 becomes 1E. Your problem is solved and all without a lot of needless erasing. Yay!
’ve had to do more than 11 drawings to complete the scene. 62 is a lot more than 11. Get used to this. Animation takes a lot of drawings to get your idea across. Now up to this point your drawings have been very easy; a line or a circle. When you start getting into the more complex drawings of characters, you could be spending up to an hour on each single drawing or more. So, if you first thought the idea of 12 drawings for each second of film sounded daunting, try multiplying that by 1 hour per drawing and you get 12 hours of drawing - or 1 1/2 days for each second of film time. for a one minute film that’s 720 hours or 103 days (20 1/2 working weeks or 5 months!!!) An average feature film at 90 minutes would take one person 64,800 hours or38 years to animate. That’s why at the end of an animated feature film you see so many names in the credits.
Pencil Test
You don't actually have to shoot a pencil test of this animation to see how it works, you could just flip the drawings in your hand to see the action.
Watch a short video showing how to flip your final animation stack.
Playing with the timing (different variations)