Humber
2nd Semester Production Art Course
Location Design Assignment
(Worth 40% of 2nd semester grade)
Students are to design a location set of a stairwell with an elevated platform area. The location must have the following elements: stairs (a minimum of 10) including a hand railing of some sort, a main floor area as the base, an elevated platform that the stairs lead up to, a primary light source, a secondary light source(s). The stairway location must be bounded by at least two wall surfaces, at least one of which must have a doorway (with a door in it), a window (open or closed), and an overhanging ceiling of some sort (which may, if necessary, be open to the sky).
You may choose any location type you wish, so long as it is pre-approved by Brian before any drawing begins.
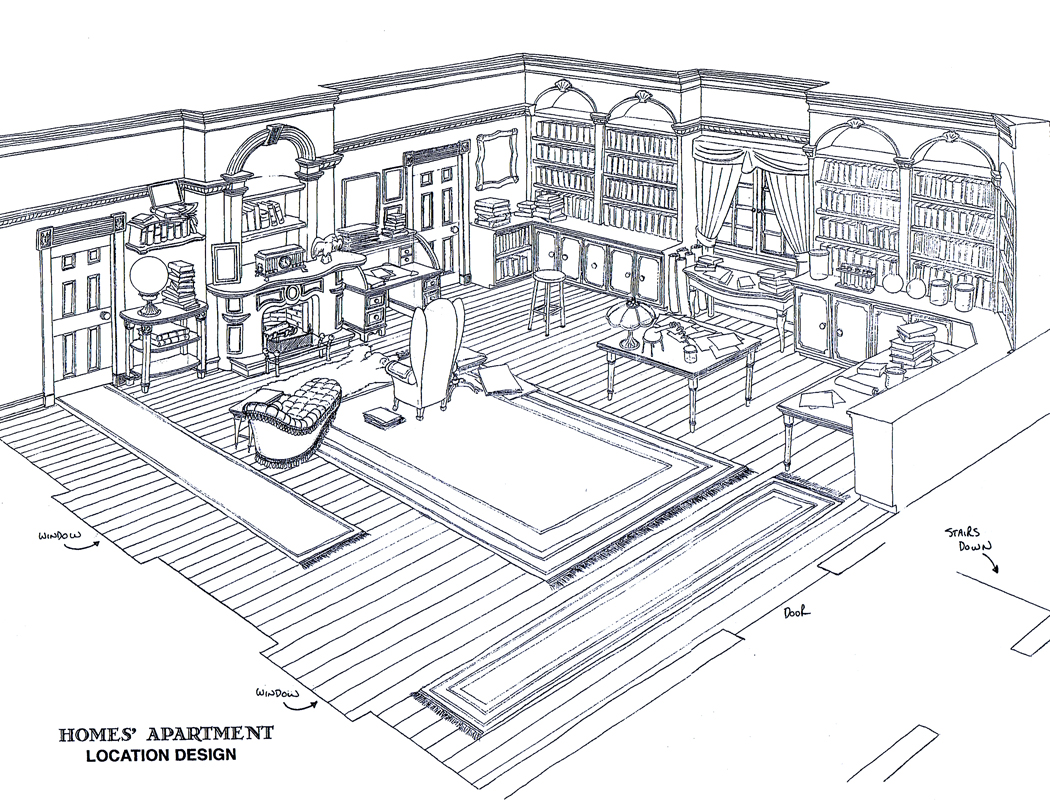
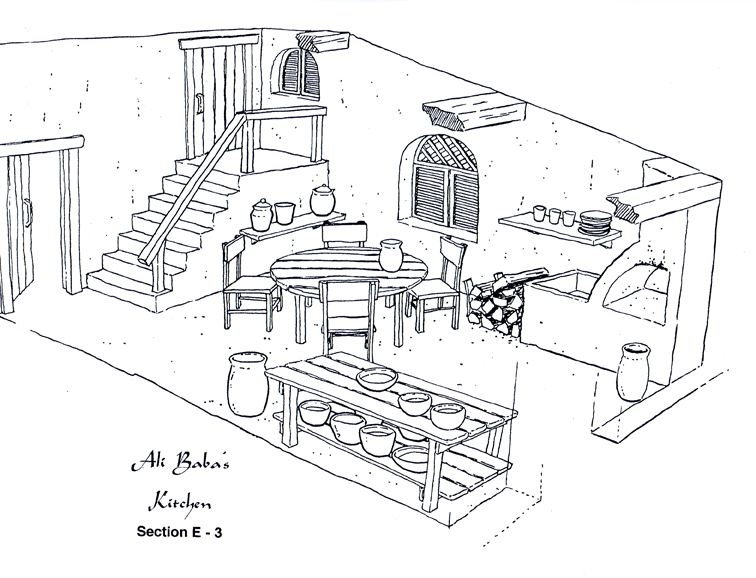
There will be two primary location design drawings in the form of a 3/4 downshot with the ceiling and two closest walls removed. Each design drawing will be shown from opposing corners. Here's an example from my Sherluck Homes design and another from the Ali Baba kitchen location.


Secondary design elements will include a 3/4 upshot design of the ceiling area, any detail drawings necessary to clearly define the various elements found within the location, i.e. structural design of stairs, any light fixtures, railings, doors, knobs, hinges, floor surface details, etc.
All drawings must be no smaller than 8 1/2” x 11” and no larger than 11” x 17”.
All illustrations must be appropriately labeled with student’s name clearly written in lower right hand corner (no signatures - first name and last name only).
All design elements must be hand drawn in pencil and may (but not necessarily) be cleaned up in pen. You may scan your drawings and composit them in Photoshop for final presentation. You may also finalize any designs with shading/colorization appropriate to make the design clearer. You must submit both the line drawings and final shaded/colored versions together. Shading and coloring the designs will not improve the final grading. A poorly designed structure with bad perspective will not be improved by any shading and or coloring and if anything will diminish your grade as the time wasted would have been better used in making the design and perspective stronger.
Principles Involved
For this assignment, we’re going to bring together all the stuff we dealt with in the first semester:
Basic perspective drawing skills
One point
Two point
Horizon line
Point of view
Field of vision
Camera angles
Shot selection
Narrative progression of shots
Storyboarding
Composition
Design
Consistancy of volumes and proportions
Spatial relationships
Thought Process
Emphasis will be placed on how imaginitive your design is. A bare-boned starewell will receive a lower grade than one with character, age, signs of wear-and-tear, support elements that will help to tell a deeper story about the location and the character who will occupy it.
This does not mean that “more is better”. Too much “stuff” can clutter an environment. You must find the proper balance of function and form.
Be prepared to “think outside the box” as to what a stairwell can actually be. Think through the purpose of the stairs. Where do they come from? Where do they lead to? What is potentially behind the door? Who will be using these stairs? Do the stairs lead up or down? What is the focal point of the location design? When were the stairs made (time period). Who made them? Are they well made? Are they in disrepair? What is the outer location of the stairs, what building are they in, or outside of? What type of material are they made of? What is the purpose of the platform? Where does the doorway go to or come from? What are the walls made of? Has there been any damage to the location? If so, by what and how long ago? What is the primary light source? What are the secondary light sources? Ask and answer these and other questions before you begin to draw. Write the answers out on paper. Create a little narrative story to describe the location as clearly as possible for yourself.
Write out a checklist of objects that you can use to fill the space and then go shopping to find images of these things for reference.
You may, if you wish (within certain limitations) skew the design of your location a la Tim Burton. This does not mean that you can throw out the rules of perspective, you just have to bend them a bit. Everything must still have a solid 3 dimensional design to it - as though you had to build a physical model out of it or build it in a 3D computer program.
The other element of the grading will be clarity of the design. This means, could I actually model the design that you have drawn in 3D from the design drawings provided? If you need to show 2 views of an element such as a light source to clearly define the design, then give me 2 - not just 1.
If I can’t figure it out, I can’t work with it.
This will be a contest to see who can out-do everyone else. Let’s see if we can have a 37 way tie for the best design package.
Here’s your schedule:
Dec 14
Hand out assignment
Dec 15 - Jan 4
Think through the assignment and come up with some ideas and research to find reference pictures for the things you’ll need to draw. Start doing some initial rough sketches to present in the first class back. Eat turkey & stuffing, have fun, open presents, get some sleep.
Week 1
Jan 10 & 14
AAAAAAAAAH!!! Show me what you’ve done so far and any ideas that you’ve come up with.
Week 2
Jan 17 & 20
Show me your initial rough drawing of the 3/4 downshot of the location design for any suggestions for revisions and fix-ups on perspective.
Week 3
Jan 24 & 27
Show me any revisions for final approval before beginning to clean-up the 3/4 downshot.
Week 4
Jan 31 & Feb 3
Show final clean-up & begin initial rough on opposing point-of-view of the 3/4 downshot design.
Start showing any rough detailed prop designs.
Week 5
Feb 7 & 10
Show rough opposing point-of-view and any detailed prop designs. Begin cleaning up all the remaining designs.
Week 6
Feb 14 & 17
Last chance to show me any designs at any stage for final approval.
Break Week
Week 7
Feb 21 & 24
Storyboard Sequence Assignment
(Worth 30% of 2nd semester grade)
For this part of the assignment you will go back to the short descriptive passage that you wrote earlier and expand upon this giving it a beginning, middle and end. It doesn’t need to have a character if you don’t want, but sometimes it can help. Begin either at the top or the bottom. Over a sequence of 10 scenes, you are to move the camera progressively through the location design to the opposite end. If you started at the top, you should end up at the bottom. If you started at the bottom, you should end up at the top.
If you have a character, use them to help you move through the environment.
Block out the composition of each scene using your location design as reference.
Determine where the camera is located. Establish a horizon line and direction that the camera is pointed in. Decide on the camera shot; long, medium, close-up shot, etc. (Usually, you begin with a long shot to establish the environment and then choose the shots based on what you want to say.)
Keep the boards rough with just the basic perspective blocked out and some landmarks indicated.
Show Brian the drawings on a weekly basis for approval.
Feb 27 - Mar 2
Hand in final design package. Begin planning out camera positions for storyboard sequence at least 10 scenes in length. Start at point A move to point B and end at point C.
Week 8
Mar 6 & 9
Display all location designs according to ranking.
Show rough thumbnail drawings for storyboards.
Week 9
Mar 13 & 16
Show any rough storyboards.
Week 10
Mar 20 & 23
Select 3 key shots for layouts.
Hand in storyboards.
Key Layout Assignment
Worth 30% of 2nd semester grade - 10% per layout)
For this assignment you are to select 3 shots out of the storyboard that will allow you to draw the most interesting compositions.
Each of these is to be drawn at an 11” x 17” size in pencil using either one, two or three point perspective.
These layouts will be based on the storyboards and location dsign packages you created earlier with a focus on dynamic camera angle, interesting composition, and attention to details, i.e. surface detailing as well as spatial relationships and proportions.
The same grading parameters that were used in the location design assignment will be applied here.
Week 11
Mar 27 & 30
Show any rough layouts.
Week 12
Apr 3 & 6
Show any rough layouts.
Week 13
Apr 10 & 13
Last week to show work
Show any rough layouts.
Week 14 - YOU ARE HERE
Apr 17 & 20
Hand in 3 layouts and designs.
Week 15
Apr 24 & 27
Show all work.
Brian's Demo Drawings (starting over Christmas Break 2011)