Introductory level
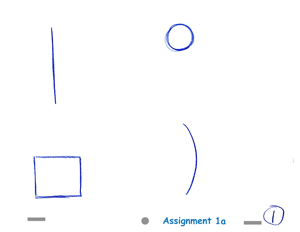
This first assignment has two keys: #1 and #3. The inbetween is #2.


You are to draw 4 different variations of the inbetween.
Variation #1 - Mathematical inbetweening
Do the inbetween as an exact half between the keys. Everything is exactly halfway. The end point paths are all straight lines - no arcs at all. Just take a ruler and plot the paths from each of the corresponding corners or end points on the lines (except for the ball drawing) and find the half way point.
Variation #2 - Overlapping Action 1
Use an arc for the paths of action in this variation.
On this version, move the bottom of the straight line over half way, but the top stays in it's starting position, stretching the line out.
On the ball, stretch it out so that the bottom is half way but the top is still at the start pose.
For the box, make it rotate clockwise on the bottom right corner. Adjust the height to grow to halfway.
The curved line should pivot on it's lower point, keeping it's Key #1 curve with the upper tip half way between the two keys.
Variation #3 - Overlapping Action 2
Once again, use an arc for the path of action. On the lines, modify it to an 'S' curve appropriate to the movement and placement of the tip.
For the line, move the bottom first and add some overlapping action, so the top moves slightly to the left of Key #1.
Inbetween the ball half the distance but keep it round as in Key #1.
Do the box as though it is three dimensional and in Key #1 we are looking at the bottom. Have it rotate as though it's standing up with that bottom plane now flat on the ground and what we see in Key #3 is the rectangular side of the box.
On the curved line, pivot on the bottom point and overlap the lower 1/3 towards the right with the top tip delayed about 1/3.
Variation #4 - Stretch, Smear & Strobe
These inbetweens will all involve distorting the line or object.
The first line should be bent and strobed with the trailing edge fading off.
The ball should be placed in the middle on and arced path of action but stretch the ball so that it's distortion is the same as on Key #3, just rotated to follow the path of action.
For the box, loop it over like a "Slinky" toy.
The bent line should be a smear, with the leading edge about the 2/3 point, closest to Key #3.
What's the Point?
In each of these variations, the inbetween was drawn significantly different.
Why?
Well, it all depends on what the object is made of and how you want it to move. Each of the inbetweens will create a different visual effect, causing you to realize something about the object or line.
The point here is to show you that it all depends. It's also to show you that even though a timing chart may "say" 1/2, it doesn't necessarily "mean" 1/2.
You need to understand why it's moving in order to interpret the appropriate action. Bad inbetweens can ruin a good action. Ask questions about the movement and be sure you get the right answers.
Back to Inbetweening Assignments
Back to Animation School Index
See my inbetweens