Leg Cycle
Successive Breaking of Joints 5
Before we jump to the full body walk cycle, let's tackle the legs by themselves so we can focus specifically on their unique movements.
Assignment
For this assignment you are to animate the two legs together at the same time doing a walking cycle. You can do a simple standard walk cycle (like a normal person walking) or you can be brave and try something different. Many people feel intimidated by this assignment because you're doing both legs at the same time and it's a lot to keep track of. If you're one of those people, do the standard cycle first. Then once you feel more comfortable with the theory, play around with it more and come up with some wacky walks.
Purpose and Principles Involved
This is similar to the arm swing but the dynamics of the movements are different in that the legs are weight bearing because of the contact with the ground. The arms simply swing and hang from the shoulders.
The legs still work as a pendulum and there's still the successive breaking of joints and overlapping action... it's just different.
As I said above, we just want to focus on the legs before we start to add in all the other parts of the body.
Thought Process
Just like in the arm swing assignment, you really need to act this action out before you begin your animation. Even if you're doing a really weird action, where the knee joint breaks or the leg spins 360? (which you can't physically do yourself) you still need to move your body to the point where the impossible takes over, just to work out the basic mechanics.
There are lots of things happening all at the same time so you really need to analyze this thoroughly.
So, from the top down, let's list the parts that we're dealing with:
The spine, the pelvis, thigh bone, knee joint, shin bone, ankle joint, heel, toe joints and toes.
The spine is our fulcrum point for the rotation and tilt of the pelvis just like we had the center of the clavicles on the arm swing. You can keep this pretty stationary if you want aside from the manditory up and down movement. It all depends on how much wiggle you want to put into it.
The pelvis will need to twist and tilt as well as move up and down. As I just said above, you can add some sway to it if you want.
The thigh bones basically swing from the hips in a pendulum motion. There are some special things that we will need to take note of when we analyze the action of the walk later on.
The shin bone pivots at the knee joint and follows the path of action determined by the thigh bone action. the shin bone provides the first level of overlapping action to the movement. Again, there are some interesting little quirks to the movements depending on the type of walk you choose.
The heel and toes are all part of the foot and provide the contact points for the walk cycle. It's important to understand how the foot reacts to the ground and what order it comes into contact with it. you could have heel contact first or toe contact first. either one will vary the way the rest of the leg and pelvis react.
The other points to note here about the feet are the angle that the feet are on the ground - pidgeon toed or duck feet (or straight) as well as both the distance of the feet in the stride position and whether the character has their feet close together (as in tight rope walking) or far apart with a wide stance (like a cowboy) or even criss-crossing the feet in front (like a fashion model).
Lots of things to think about eh?.
But WAIT! There's even more!!
Let's start with the basic standing pose and find our "point of view" for the animation in the scene. We'll treat this similar to the arm swing assignment, in that we want to be looking at the character in a 3/4 front view. Not a pure 3/4 but twisted to a slight side view. To do this, we need to create a perspective plane for the character to stand on.
Place the horizon line up high on the paper, about 1" from the top. Extend the vanishing points off the paper about 11" to the left and about 3" to the right. You should have something that looks like this:
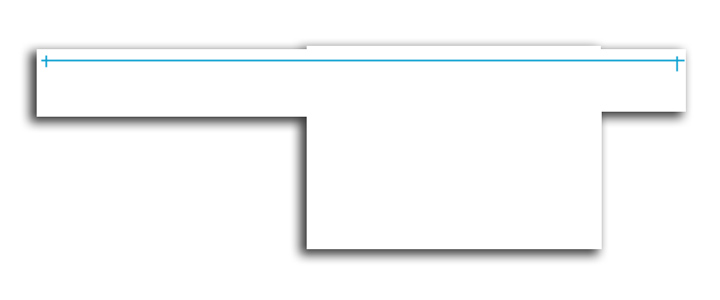
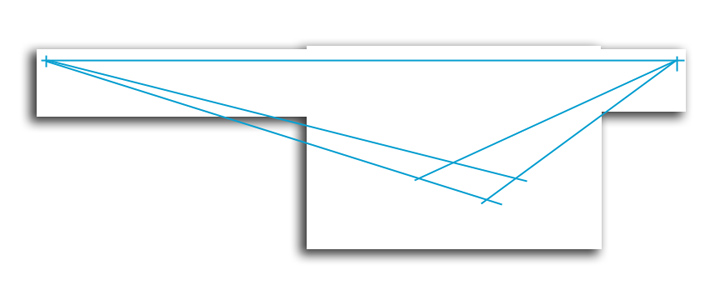
Now draw the legs of the character standing on this plane with the feet lined up to the lines on the ground. Make sure the knees and pelvis line up to the vanishing point to the right side.
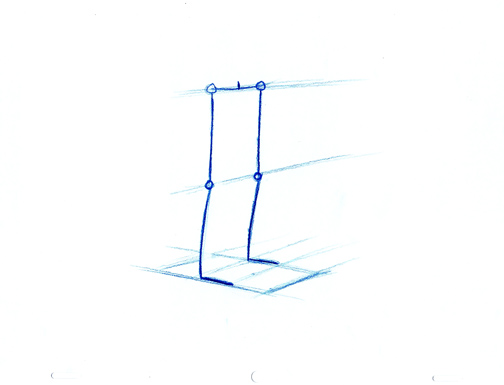
This will act as your proportion/model guide. Don't worry about volumes at this point. We want to keep this simple and fast to draw. Same as we did with the arm swing assignment: draw the hips and knees as small circles and the legs and feet as simple lines. If you really want to you can add some volume to the feet for the purpose of figuring out the perspective or rotation of the foot.
Now using this as our basis for the design, we need to find our first key pose #1. This will be the full stride pose. We can draw this pose with the character's right leg forward and the left leg back..

The heels on both feet should line up with the perspective plane that you drew as a guide. Remember that the wider you draw the feet apart, the lower the pelvis must drop. In this example I also have the legs drawn straight - without any bend. You can bend them if you'd like but this will also lower the pelvis even further.
Next, draw the mirror image of the legs with the right leg back and the left leg forward. This will also rotate the pelvis towards the viewer, making the hips appear wider apart. This will be drawing #9.

Again, be sure to double check the perspective to be sure the hips, knees and ankles match up to the perspective in drawing #1.
Now, with drawings #1 and 9 on your light table, do the breakdown #5. Place drawing #1 on the bottom, then 9 on top and finally the blank sheet for #5 on the top. When you flip the drawings, irt's easier to see the progression in order and recognize the direction that the feet and legs are moving. Every once in a while, I get this mixed up and do the breakdown for #13 first, but label it 5. Then if I do the first inbetween between 1 and 5 - #3, it'll be moving the wrong way. I'll have waisted my time and have to renumber it and redo the proper inbetween.
Here's my drawing #5.

I've chosen to make my passing position the low point in the cycle.
Now we need to deal with the foot placement for both the left and right foot. How do I know where to put them? The first thing we need to know is the distance between the heels on the right foot which is on the ground. You can see how the heel is just touching the ground in drawing #1 in the forward position with the toe up and in #9, the foot is back with both the heel and toe down. All we need to do is measure the distance and divide it in half.
Here's a simple drawing of the path of action for the foot - specifically, the heel.
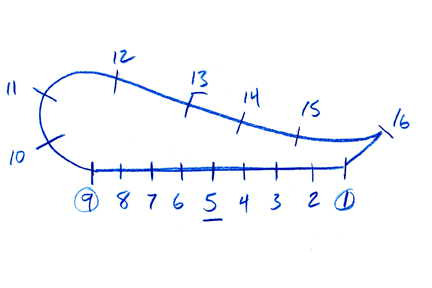
You can see how the part that is flat is the foot on the ground and then it lifts into the air and moves forward then back down to the start position. These paths of action need to be divided equally so that the cycle appears to be nice and smooth. In all the previous assignments, we've always used a slow-in or a slow-out at the end of each movement into the keys. In this case, we want the action to be equal and smooth, otherwise the walk will slow down and speed up.
Think of a treadmill in an excercise gym. When you step onto it and set the speed then press the "go button, the engine starts up and moves at the constant rate that you chose. We want our cycle here to have the same illusion, You can play with the spacing on the forward part of the movement a bit, but the contact movement on the ground must be constant.
If we were to take this project all the way through to the completed stage with color and a background, the character would be stationary in the center of the screen and the background would pan in behind. The individual movemements of the background are based on the distance calculated between each drawing in the cycle. You simply measure the distance (which should all be the same) and that's how much the background is moved.
After we've drawn #5, we then do #13 - the opposite breakdown pose. Take all the drawings off the pegs and put #9 down first, then #1 on top. You can then repeat the process we followed for #5, or you can put drawing #5 on top of these two, then a blank sheet of paper to draw #13. As you flip the drawings to do the inbetween, hold the papers like you normally would, except hold #5 and the blank sheet on top together, simply using #5 as reference to double check your perspective and mirror image.
Here's my drawing #13.
 .
.
Notice how the hips are tilted opposite to drawing #5 because the right leg is off the ground and it's weight is pulling it lower than the other side.
Now if we look at a pencil test of just these 4 drawings timed to a 16 drawing cycle, you'll be able to see the basic action. It's still very jerky and doesn't show any of the overlapping action that we want to add in when we do the remaining inbetweens.
.
Next we'll add in the remaining inbetweens. As we go through them individually for the one side, I'll cover all the little subtle movements and spacing that seems to go against what your brain says should happen. All this stuff can easily be discovered if you take the time to really analyze the action that you are planning to do for the character. This very statement goes for every piece of animation that you will ever do.
Use the perspective plane on drawing #1 to plot out the halfway positions for drawings #2 through 8
Each of the ticks you've made along the line (path of action) can now be used as the exact positions for each of the heels in drawings 2 - 8.
Do the exact same thing for the opposite leg on drawing #9.
As you proceed through each of the inbetweens now you need to figure out exactly what it is that you want the legs to do. In drawing #2, the leg making contact should buckle slightly to absorb the weight of the character. This will require you to draw the leg in a position that is not a halfway inbetween, in fact it goes beyond the knee position in drawing #1. This is where your brain is going to be saying, "Hey, wait a minute! That's not right." Ignore your brain at this point, even though I've told you time and again, to "think when you draw" in this case, think about the action and not what your brain tells you is technically impossible. Also try to make the toes come down hard on #2. If you keep them up in the air as a half-way inbetween it will make the step look soft here. Also remember to rock the back foot heel up while keeping the toes on the ground. Be sure the toes move back the same amount as all the other incriments previously. Too far back and it will have the appearance of suddenly slipping. Not enough and it will appear to stick slightly.
The fact that the knee should buckle on drawing 2 will probably mean that the leg should be recovering back to a straight position in #3. Flip the drawings and make sure this is the action that you actually want taking place.
#4 will proceed back as a half inbetween. Take note here of what the back leg is doing on it's movement off the ground and the pull forward. You may want to take #2 back and up slightly and even begin to drag the toes a bit to create the proper overlapping action that you want.
Drawing # 7 is the tricky one. The foot down is a simple half-way inbetween, but the leg coming forward needs to go beyond the position you've drawn in #9. Again, this goes against what you will see in your breakdown #5 and key #9.
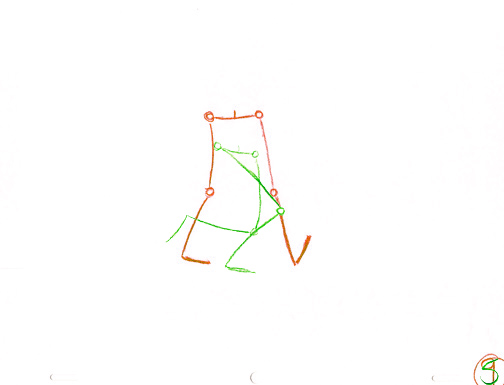
Your brain will say "Half-way inbetween!" Don't do it. Go past #9. Do your action yourself and see it happening in the knee. It goes beyond and then buckles back into 9.
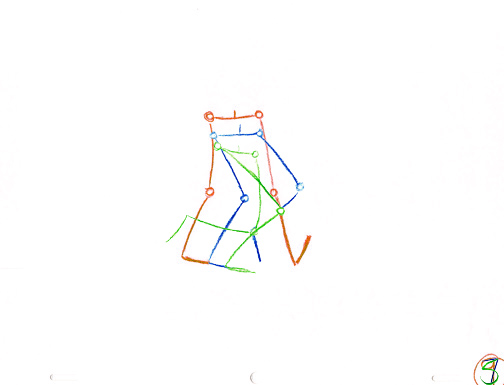
#15 is the opposite of 7 so you really should do it next, just so you don't forget about it.
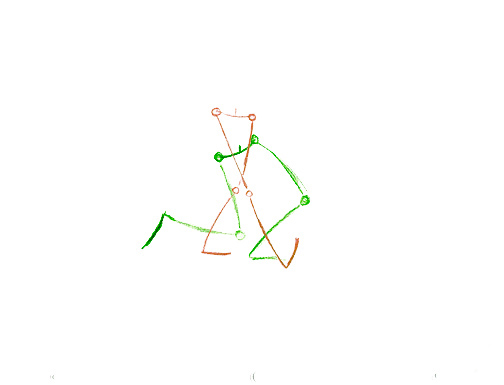
Here is breakdown #13 in green and key #1 in red:
And here's the inbetween #15 in blue:
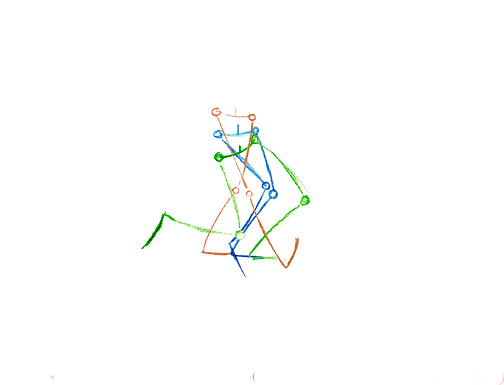
Notice the right leg in blue goes out beyond the key position in red.
Here's a pencil test of the keys & breakdowns and main inbetweens.
Finish off the remaining inbetweens looking for any areas where you can add in some delay or drag to enhance the overlapping actions.
Here's the final cycle inbetweened:
Here are a couple of other cycles I completed in class:
One of my students said this looked like an ostrich walk. I'll go back and add in a body and head to finish it off.
This cycle is more of a standard walk. If you feel like this exercise might be a bit too much for you to try anything weird, just do a standard walk until you feel comfortable with it, then go in and have some fun.
Next, we'll move on to the full body walk cycle and put all the stuff we've covered so far together... yay!
Use the inbetweening flipping method shown in this video.
Pencil Test
At this point, because things are getting complicated, it would be best for you to shoot a pencil test. This will also help you to see if the timing is proper.
Watch a short video showing how to flip your final animation stack.