Intermediate Level
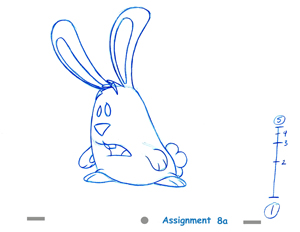
This assignment has Two keys: #1, and 5. There are three inbetweens for this assignment.


You are to draw the 3 inbetweens according to the timing charts provided.
Here's another version of the head turn with the body attached. Once again, the goal here is to keep the character looking solid and three dimensional while retaining the volumes and model. This assignment has the added complexity of the ears and arms to deal with.
First, start by flipping the two drawings. Look at all the different parts and take mental note of what they are doing. Think about the principle you will be applying to it; drag, overlapping action, squash, stretch.
Begin by drawing just the inbetween of the basic shape of the body. It's a really simple bean shape with a flat bottom. You need to decide on what part of the body is going to lead in the turn and what is going to trail. Does the top of the head lead? or does it loop around three dimensionally? Draw a simple path of action to discribe where it's going to go. Think about throwing a baseball. I know it seems out of context, but it applies. Do you throw the ball overhand? Sidearm? Underhand? Shotput style? The way you throw will dictate your path of action on your arm. The same is true here. Decide on how the character is going to move first and lightly sketch it out, then flip the drawings to see if it's doing what you want it to.
Add on a center line to show how the features will rotate. Does the nose drag? Does it dip down as well?
Should the hips lead first followed by the head? Would this create greater overlap by having the hips pop to the right but the head moves to the left, beyond drawing 1? Decide all this before you add anything else to the drawing. Once you have what you want, move on to the face.
If you decided in the body action where the center line and eye lines are going to be, you can now use them as a guide for placing the features on the head. As we did on the Panda head turn, we're going to close the bunny's eyes during the turn. You might also want to close the mouth if you have the head tilting down.
Next inbetween the arms. Depending on how you drew the body, the arms could be in any number of different positions. Continue to flip the drawings to be sure the arms don't pop or change the angle of drag. no matter what you've chosen to do, the arms must follow the shoulder points. Don't let the hands (paws) lead as this will look awkward.
Finally, add on the ears. Again, depending on what you've chosen with the body and head, the ears simply follow, starting at the base and working out to the tips. Never have the tips lead or slip out of their path of action (which should be shaped pretty much the same as the head path of action.
Flip, flip, flip to be sure it's doing the right thing. If it's not, make the correction. Don't get lazy!–
Back to Inbetweening Assignments
Back to Animation School Index
See my inbetweens