Intermediate Level
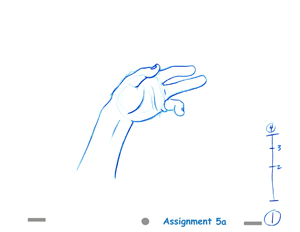
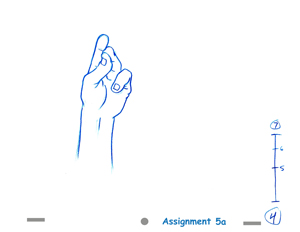
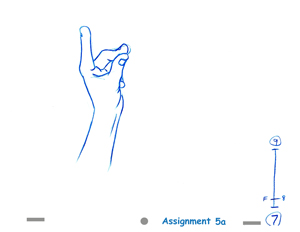
This assignment has four keys: #1, 4, 7, and 9. There are five inbetweens for this assignment.


You are to draw the 5 inbetweens according to the timing charts provided.
Here's a fun assignment that involves some hand drawing. What's nice about this assignment is that it involves not just drawing but actual observation of a hand in motion.
The action is a hand snapping it's finger.
Hold your own hand in the first key position relative to your own eyes. Now move through each of the keys replicating the snapping action.
Set the keys down onto the pegs with 1 on the bottom, then 4, then 7 and finally #9 on top. Take the drawings in your fingers and do a roll flip to see the action taking place. Become familiar with each of the different parts of the hand and how they move relative to the drawing before and after. As I mentioned, this is not an issue of moving lines from one point to another on a flat sheet of paper. You now need to think about the action of the hand in three dimensions: height, width and depth.
I used my own hand as a model for this action and caricatured the volumes and structure... and no, I don't actually have only three fingers... it's a cartoon, o.k.?
As you begin with inbetween #2, place your hand in the pose on drawng #1 and then move it into the pose on drawing #4. Do this action over and over a few times and get a sense of the different parts and how they move. Now do the action again and stop at the half way point. Observe the positions of your fingers and thumb. This is what your drawing #2 should look like.
Begin the drawing by lightly drawing the volume of the hand as a half inbetween. No details, just the two outside lines of the forearm and maybe a box for the volume of the palm. There is a pivot to the wrist and the middle finger moves towards the thumb as the little finger rotates and curls over. Lightly draw in the fingers and flip the drawings constantly to see if the action is moving the way it should. Begin to tighten up the lines that represent the different parts of the hand, taking note of wrinkles that may appear or disappear and the fingernails.
Once you are happy with the inbetween, move on to drawing # 3 and repeat the process again.
Move on to inbetweens 5 and 6 following the same procedure.
When you get to inbetween 8 you'll probably already have noticed that it's a favor again. In this case, it's closer to the first key #7 rather than the later key. This is considered a cushon out of the key. It will cause the action into 9 to be much faster and create the snap we want. Do a slight rotation on the hand out of 7, but not too much.
After you've completed all the inbetweens layer them in flipping order from bottom to top and do a stack flip to see the action.
Neat huh?
Here's a pencil test of the drawings as timed above.
Here's the same action with a few more inbetweens added in and shot all on twos.
And here it is again on twos and ones to give the best timing.
Back to Inbetweening Assignments
Back to Animation School Index
See my inbetweens