Arm Swing
The action of the arm swing is something that everyone really takes for granted. It’s just an automatic action that takes place when people walk. Nobody ever thinks about the swinging of their arms when they walk. Most people don’t even think about how they walk... do they? At some point in our lives we’ve probably thought about it. I can remember as a young teenager, analyzing the way I walked. Wondering if my toes pointed in too much or out too far. Is my stride long enough or too short? Do I bounce when I walk? Are my hips moving too much for a guy? Are my arms swinging weird? Are they swinging at all? Do I look like a geek?
I’d watch how other people walked and thanked goodness that I didn’t walk like that. Then I wondered if they ever thought about the way they walk. Maybe to them, this was the perfectly natural and correct way to do it.
Observation can be our best friend in animation. It is through observation that we gain our inspiration for what we draw. We caricature it enough to make it humorous when necessary or tone it down so it doesn’t grab and steal our attention from the more important action within the scene. We can also push it to comic absurdity beyond anything that a real human could do.
Understanding how things move is what being an animator is all about.
A character’s arms can move in many different ways. Think about it for a second. What do your arms do? For me, right at this moment, they are holding my hands just above the keyboard of my computer as I write this section of the book. An hour ago, they were stuffing food into my face because it was supper time. And before that, I was drawing. Before that, I walked to the mail box and picked up my mail. When I got home, I opened some of it, read it and threw 90% of it in the garbage. Each of these things required my arms and hand to perform a specific function. Grabbing, holding, moving, lifting, throwing, pushing, pulling, turning, tying, picking, typing, swinging... did I say picking? I meant picking things up, not picking my nose. Get your mind out of the gutter, sheesh!
Each of these actions were second nature. I just did them because I needed to do certain things at certain times and when I said to myself, “Wow, that booger is really big, I’d better pick it out right...” OOPS, sorry, wrong thought process, what I meant to say was, “I’m hungry and I want a bite of that hamburger.” my hands and arms reacted the way I wanted them to and they got that hamburger to it’s proper destination.
As an animator, when you are called upon to deliver a scene with a certain type of characteristic action, you will need to hyper-analyze the actions fully in order to portray them convincingly.
As a build up to the Walk Cycle assignment that you will be doing shortly, we will break up the different components of the walk so that you can understand the dynamics of all the parts put together better. We’ll start off with the Single Arm Swing assignment then move on to the Double Arm Swing. After that we’ll do the Leg Walk Cycle and then we’ll get into the full Character Walk Cycle.
AssignmentFor this assignment you are to animate a wireframe arm of a character swinging back and forth. All you are animating is the arm from the shoulder to the fingertips, you don’t need to draw a character for this at all.
Keep the action fairly subdued on your first attempt. If you want to try something more eccentric on a second try, go ahead.
Purpose and Principles InvolvedThe Single Arm Swing assignment will allow you to focus on the one arm so that the subtle nuances of the action can be more clearly understood without having to worry about the positioning of the other arm at the same time.
This assignment is very similar to the Sliding Seaweed and the Overlapping Pendulum assignments. The actions and principles are basically the same.
Work very simply with this one. Don’t try to draw the arm anatomically correct with all the muscles and detailing. Keep it as a simple line with a small ball to indicate the shoulder and elbow joints. If you want to include the collar bone as I have, that’s o.k.
Like I said before, the principles involved in this assignment are the same as the Sliding Seaweed and Overlapping Pendulum:
• The Effect of Gravity
• Realistic Timing
• Use of Arcs
• Weight
• Slo-in and slo-out
• Use of the Repeat Cycle
• Spatial Relationships
• Consistancy in Drawing
• Reading and Following a Timing Chart
• Maintaining Volume and Proportions
• Flipping Your Drawings
• Overlapping Action
• Different Types of Paths of Action
Begin this assignment by acting out the action of the arm swing. You really should do this while actually walking to get the proper action. If you just do it standing still right away, some of the movements become stilted and improperly timed. By walking, you create the appropriate cadence or timing for the action in relation to the movement of your legs and hips. Find a place where there is nothing that you can bump into like a high school football field or a park near your house. This also needs to be a place where you won’t feel self conscious. If there are a lot of people around and you’re standing in the middle of a field doing these arm actions and breaking them down ‘frame-by-frame’, you’re going to get a lot of stares. Early in the morning is the best time. If you do it late at night people are bound to call the Police complaining about “some intoxicated person is out in the middle of the field, flailing their arms around”. It’s very difficult trying to explain what you’re really doing out there in the middle of the night... not that I actually know any of this from personal experience or anything... it’s something that happened to a friend of a friend of mine.
So, anyhoo, act out the action while you’re walking and study by “feel” what your arm is doing. Feel how the shoulder leads the action while the elbow and wrist then fingers follow through. Get a sense of the timing of the movement of the shoulder as to how many drawings it moves back while the rest of your arm is moving forward. What is the overlap? As your arm moves forward, what is the angle of your elbow? What is the angle of your wrist? Where are your fingers pointed? On the swing back, ask the same questions again.
When you swing your arm, think about the action of the elbow and wrist as though you were looking at it from above. The path of action is completely different from that of the pendulum swings. Notice how your hand arcs across your belly. Does it follow the same path of action on the way back? How does the wrist react as the arm changes direction? How many drawings is the delay? Is it greater than the delay of the shoulder and arm?
Boy! There sure are a lot of questions to ask. (Watch out for that tree.) This is why you need that wide open space. It’s hard to walk and think about what your arm is doing at the same time. (If you’re also chewing gum while doing this, you may consider yourself a true genius.)
O.k. now get off your pedestal and get back home, it’s time to start drawing.
Now to draw your first key.
I was going to leave the rest of the page blank here just to let that sink in for a bit and give the statement more impact.
So, what is your first key going to look like? What position should you draw the arm in?
Well you could start with the extreme. But which extreme? The shoulder in it’s farthest forward or back position, or the elbow, no wait, maybe the wrist, or how about the finger tips?
Yikes!
It didn’t seem quite this hard with the seaweed or the pendulum. Why does this seem so difficult? Well, it is and it isn’t. When I sat down to do my example animation, I didn’t really worry about whether this is the right key position to start with or not, I just did it. I know that sounds like an incredible cop-out statement, but it is true. I just sat down and drew it and it came out and it worked. It’s one of those intuition things. Granted, my perspective is probably quite a bit different from yours in that I’ve been animating for over 20 years and you’re just starting. I have more experience but that’s about it. I have never animated a single arm swing in my entire life before this one and have probably only ever animated 5 characters walking (including my 1st year College walk cycle), so why did this one just come out?
Well, this is just one of the mysteries of animation. Sometimes I can sit down, and the animation just pours out. Other times, I question why I ever got into the business, my drawings are so bad. I really don’t want to pretend to understand it all and have all the answers, because I don’t. I know the theoretical principles. I know how to analyze an action. I know how to act it out. I sometimes know how to draw. I guess it all comes down to intuition, inspiration, and lots of perspiration. You try stuff out, if it works, great! If it doesn’t, well just throw the drawings away and try it again in a different way until you get it right. (You’ll see what I mean when we get to the Leg Cycle assignment.)
So, enough psychological introspection, let’s get back to that first key drawing. What should it look like? Go stand in front of a mirror right now. Make sure it’s big enough for you to see your arm swing action. Start doing the action and do the frame-by-frame pause for each position. Cycle through this way a few times. Find that one key pose where the arm is forward and it changes direction at either the elbow or the wrist and make that your key pose. Do the same thing for the back motion.
Now decide on your timing. Later, we’ll be doing a 16 drawing walk cycle so let’s work with that.
Your key drawings will be 1 and 9.
The next big decision will be how do you want the actual swing to be timed out on the forward motion and the back motion? They don’t have to be the same if you don’t want them to. Let’s look at some variations in the timing.
Here are my two key drawings registered to each other:


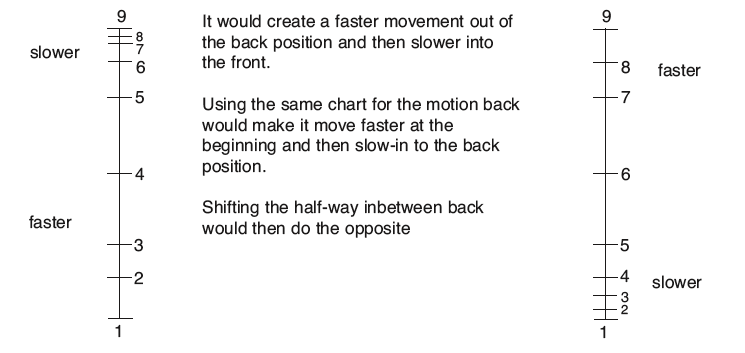
Shifting forward would give you a timing chart like this:
A shift of one more drawing would create too much of a snap to the arms and make it seem far too unnatural. It could also give the character a look as though they have a limp.
Once you have determined your timing, you then have to decide on the overlap of the shoulder to arm and arm to hand. I would suggest no more than a two drawing overlap. You can do three if you want to really exaggerate the action of the arm, but this would make the swing look very comic. I’ll leave that up to you.
Once again, go back to the mirror for your reference. Act out the action that you want and see how the overlap takes place. You may find that you’ll have to use a combination of the timing charts for the three different parts of the arm: one for the shoulder and it’s action, one for the arm itself to the wrist or to the elbow, (your choice) and one for the wrist and hand action.
By shifting the timing on the hand as shown in the first timing chart above, you’ll create more of a snap to the wrist coming out of the back pose. By using the second timing chart above will give more of a snap to the hand as it comes into the forward pose. It all depends on how you want the arm swing to feel and that’s completely up to you.
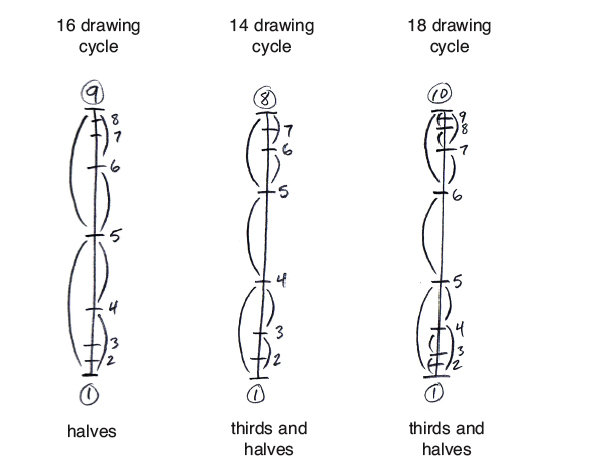
Another alternative is to place your main inbetweens on thirds rather than halves. This will modify the timing slightly to give a faster movement in the middle of the swing and slower at either end. It’s almost the same as the first timing chart on page 226, but the subtle timing shift does make a slight difference. It also changes the cycle into a 14 drawing cycle since you would eliminate the middle inbetween. You could slow the action on either end a bit more by adding an inbetween on each end. This would make it an 18 drawing cycle.
Something else you can try would be to use one type of timing on the forward swing and something different on the back swing.
Now to really mess up your brains, here’s the timing that I used for my arm swing:

Why I decided to do it as a 12 drawing cycle is beyond me. Like I said before, I just did it and it turned out o.k.
The final thing that you can do to alter your timing is change the frame exposure. You can shoot some of the drawings on one’s and some on two’s.
Beware that this will only work for this arm swing but not the actual walk cycle. The foot spacing on a walk cycle must be evenly paced for it to work properly. Shooting parts on one’s and twos will make the walk jerk.
Here are some pencil tests of the demos that I did in class to show different variations. These are all 16 drawing cycles.
This version is more of a slapping type of action.
This swing has a very fast action in the middle coming forward.
In this version, the character's arm is punching the air.
Here is a swishing action and the hand goes across the body.
This one is very similar to the one above, except the hand has a swish forward and down as opposed to across the body. Also notice the action of the shoulder between this one and the last one..
The one thing they all have in common is overlapping action.
Use these as inspiration to come up with your own arm swing. Next, we'll add in the second arm swing.
Use the inbetweening flipping method shown in this video.
Pencil Test
You don't actually have to shoot a pencil test of this animation to see how it works, you could just flip the drawings in your hand to see the action.
Watch a short video showing how to flip your final animation stack.
You can view my lecture for this assignment online at YouTube now.

Arm Swing lecture Part 1 (18 minutes long)

Arm Swing lecture Part 2 (18 minutes long)
Arm Swing lecture Part 3 (18 minutes long)