Stationary Seaweed
Assignment
In this assignment, you will be animating a piece of seaweed on the ocean floor, waving back and forth.
Purpose and Principles Involved
This assignment will introduce a more complex form of overlapping action. It will also continue to reinforce the application of the principles already dealt with to this point.
• Keys
• Inbetweens
• Timing
• Slo in & Slo out
• Stretch & Squash
• Overlapping Action
• Effects of Gravity
• Weight
• Realistic Timing
• Use of Arcs
• Observation
• Flipping
Additional Principles Involved
• Use of the Repeat Cycle
• Spatial Relationships
• Accuracy in Drawing
• Maintaining Volume and Proportions
Watch the lecture from Oct 17th, 2011
Thought Process
Take a blank sheet of paper and find the very center of the page. You can do this by lightly drawing an X from the opposing corners of the paper. Where the two lines bisect each other, that’s the center of the paper. From this center point, draw a line like this:

Now, on a second sheet of paper, draw a line like this from the same center point.
(It’s the same as the first one, just reversed. Take drawing 1 and flip it over then trace it.)

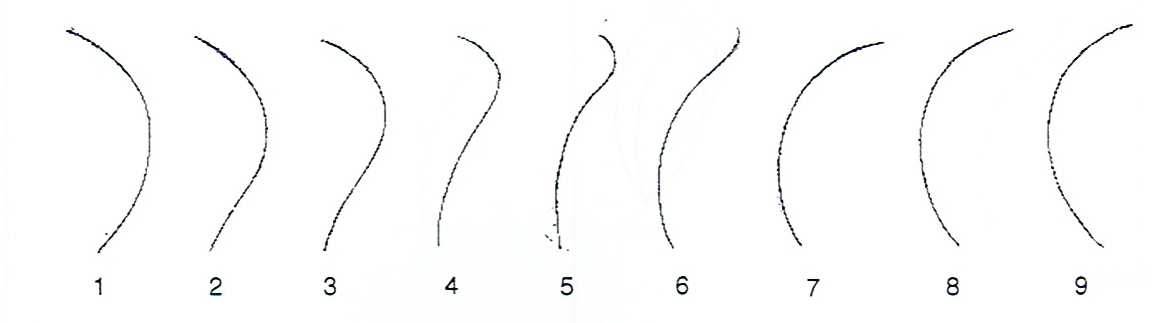
Now, here’s the tricky part. You want to animate the line reversing direction beginning at the bottom and working it’s way up to the top. The line must stay the same length throughout all your drawings. (Remember the stuff about maintaining proportions?) So, while the top tip of the line is still moving to the right in an arc, the bottom part of the line is moving to the left.
Here is the path of action for the top of the line:

The force of the action is from the base of the line. The energy travels up the line to the very end through the action. Think of it as a dog wagging it’s tail. The tip of the tail doesn’t initiate the action, it’s the base of the tail where it attaches to the spine. It’s the same theory here. In actual fact, the seaweed is not acting of it’s own accord, wagging itself from it’s base, rather it is reacting to the watter current around it. But, that’s beside the point. The action is the same regardless.
So, Here are all the drawings spread out:

Once the animation is completed, give the seaweed it’s final look by adding some substance to the spine.
Use the drawing below as a guide for your final design.

Rememer to use your drawing principles and begin to think about cause and effect when drawing your seaweed. If you put a little cut in the side of it, be sure that it expands and contracts when it bends both ways. Don’t just leave it the same size.
Here’s what I’m talking about:

Pencil Test
You don't actually have to shoot a pencil test of this animation to see how it works, you could just flip the drawings in your hand to see the action.
Watch a short video showing how to flip your final animation stack.