Soundtrack Breakdown
Breaking down a soundtrack is not too difficult once you get used to it. It does however take a lot of concentration and a lot of time.
Here’s how it goes. Once you have your soundtrack recorded, edited, and properly timed out you can then go about the process of breakdown. Breakdown simply put is finding out exactly what sound is being made on every frame. To do this properly you need to have the soundtrack opened in something like Premier.
This section will describe the process in Premier.
Step 1 - Make Copies of the Exposure Sheets
First you will need to make copies of the blank exposure sheet.
Step 2 - Label the Exposure Sheets
I personally like to get all the labeling work done ahead of time so that when you are deep into listening to the track and figuring out the sounds you don’t need to worry about numbering the frames.
Start by finding out how many frames there are in the scene you will be working on. Let’s pretend there are 253 frames. That’s the same as 10 1/2 seconds, or 10 seconds 12 frames. To calculate the number of seconds in your scene just divide the number of frames by 24.
Note:
When you first created the project file in Premier, you may or may not have noticed that you had the option to set the frames per second at either 24 or 30. The default is 30 frames per second (fps). For our purposes, 24 frames would be better as that is the animation industry standard for timing for film. With the advent of computers, some people animate to 30 fps which requires you to alter your overall perception of time in frames and can create some awkward timing charts. 24 can be divided evenly down to 2: 24 ÷ 2 = 12, 12 ÷ 2 = 6, 6 ÷ 3 = 2. 30 can’t be divided evenly down to 2: 30 ÷ 2 = 15. You can’t divide 15 in half. 15 ÷ 3 = 5 but you can’t divide 5 by anything.
Go to PROJECT then SETTINGS and select GENERAL. Set the “TIMEBASE” to 24 fps

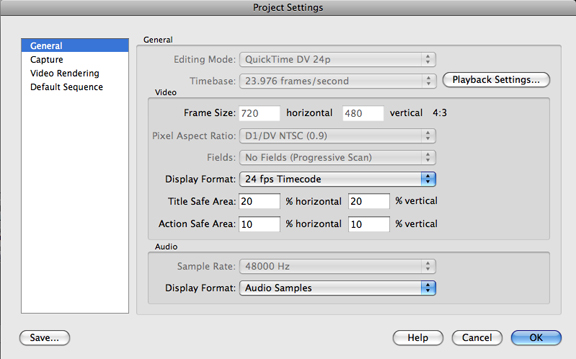
If the Timebase option is locked or only shows: 30 frames / second, you will have to open a new project from scratch and then select the "24 frames / second" option (it's actually 23.976 frames / second).
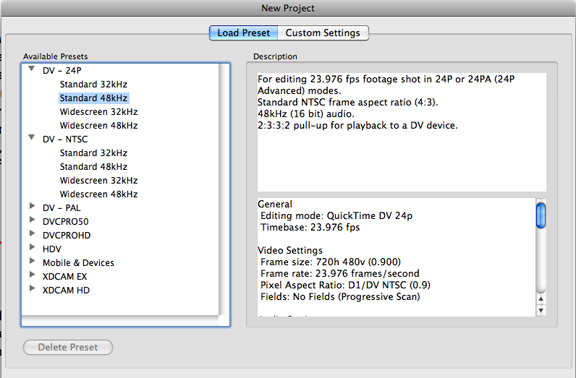
Under "Available Presets" click on "DV - 24P" and choose "Standard 48KHz" then in the Description window it will say "For Editing 23.976 fps..." Select the location you want to save the project in the lower option windows and give it a name then click on "O.K."
Step 3
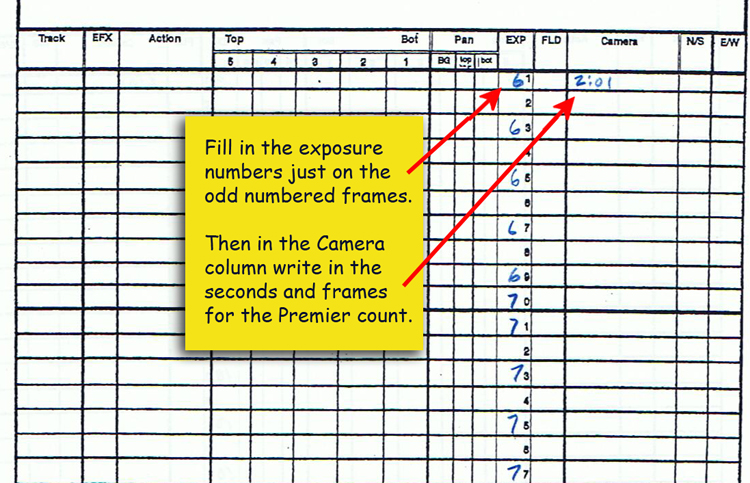
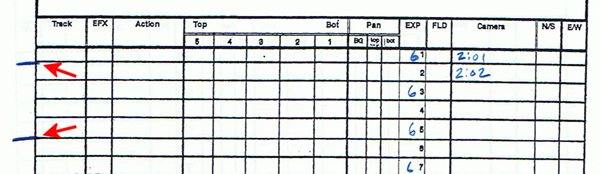
In the right side column with the numbers from 1 - 9 then 0 and then repeating again, write in the 10’s numbers on every other frame. So, for the first 9 frames, leave them blank and then add a 1 in front of the first 0 to make it 10 then 11, then 13, 15, 17, 19, 20, 21 and so on up to 253 (or whatever the final frame in your scene is).
Next label the page numbers: page 1 of 9, 2 of 9, 3 of 9, etc. Now staple the exposure sheets together in order. Now you’re all set to begin the soundtrack breakdown.
Step 4 - Listen to the Soundtrack
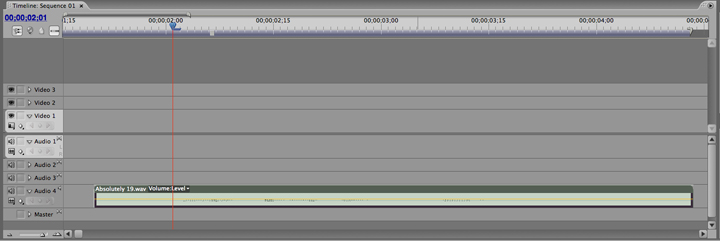
With the soundtrack opened in Premier, it should be sitting in the audio tracks.
If you haven’t “rendered” the project or “saved” it yet, do so now. To render, simply press the enter key. DO NOT mix the tracks together!!
If you have multiple tracks with sound effects and music, turn these tracks off so you can’t hear them. It’ll make listening to just the voices much easier.
Listen to the vocal soundtrack several times before you start the physical process of breaking it down. This will help you to understand the overall timing and refresh your memory as to the dialogue being delivered.
Using the cursor to grab and move the time slider and find the very first sound of dialogue. Look at the frame count then find the corresponding frame on your exposure sheet. If the first sound begins on frame 53, find it on the exposure sheet. Here comes the fun part now. Using the cursor you need to “scrub” the track. It’s just like when you are scrubbing out a dirt stain with a cloth, you rub back and forth over it. You do the same thing with the soundtrack. You move the cursor back and forth over the word on the track to hear when different sounds hit. It’s kinda hard at first but when you practice a bit you’ll start to get it. Take a look at the video example on the DVD titled “Scrubbing the Track” to see me doing this.
Step 5
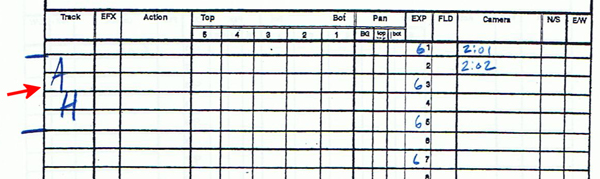
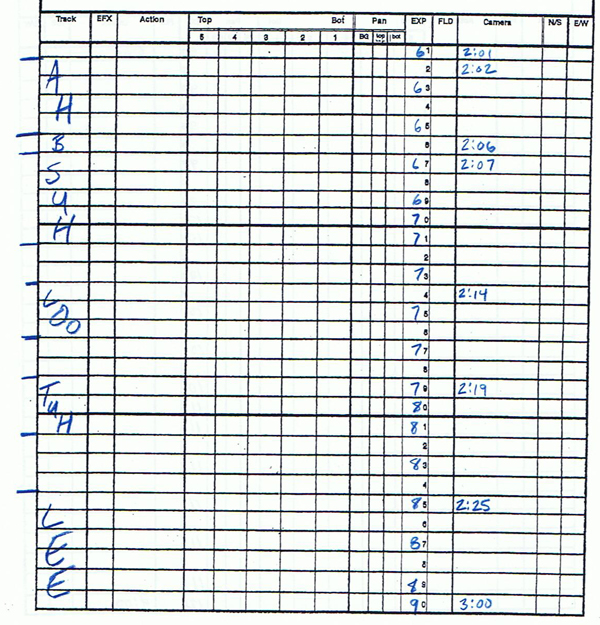
As you go through the track, listening to the different sounds, take note of where the sound begins and ends and mark this down on the exposure sheet accordingly. These notations will be your guide for later on when you begin to match up the drawings and mouth positions.
Work Phonetically
When you listen to the track and write down the words, don’t write it as it’s actually spelled, rather write it as it sounds. This is called Phonetics. Most of us learned how to read this way, by sounding out the words as we read them. If you look back at the section on What Is Lip Sync?, you’ll see how all words are broken down into sounds called “vowels” and “consonants”.
Work your way through the soundtrack until everything has been broken down completely. It may sound redundant, but you really should go back over the whole track and double check to make sure you haven’t made any errors. An error at this point will cost you big time later on when you’re animating. It’s much easier to find it now rather than later on in the middle of the drawing stage. I've had students who didn't accurately breakdown their sound and went on to animation. When they tried to match their drawings up according to the exposure sheets, it wouldn't sync up and they would get upset about this. I'd take their exposure sheets and scrub through the track only to find out their original breakdown was wrong. One student was off by 7 frames at the end of the first word. Another student did the breakdown but instead of figuring it out on two's, they had it on one's for some unknown reason, so their animation drawings were twice as fast as the sound. Fortunately, all they had to do was add an inbetween for each drawing to make it work.
Once the breakdown is completed, you’re ready to move on to the animating stage.