In animation, there is a heirarchy. Overseeing the entire production is the Director. In some cases there may be two or even three Primary Directors on a film. The final film is dependant on their vision of what the picture is supposed to be all about.
Under the director are the various departments responsible for physically producing the movie. Obviously, if it has animation in it, there will be an Animation Department. There will be an Animation Director (or several of them) responsible for all the animators who make the characters come to life.
There are usually teams consisting of the Lead Animator, an Assistant Animator, and a couple of Inbetweeners.
The Animator's job is to come up with the rough key extreme positions of the character in the scene, based on the information from the storyboards, the layout from the scene and the direction from either the Supervising Directors or the overall Director.
These rough keys might be extremely rough and scribbly or very tight and detailed. The Assistant Animator's job is to take these rough keys and "clean them up". This entails redoing the drawing on a separate sheet of paper by tracing over it on a light table. The Assistant interprets what the Animator wants from the drawing and if necessary, fixes any errors in proportion, volume, structure, adding details such as clothing, etc, and basically making sure the character is "on model" without veering from the intent and dynamics in the original rough key pose.
The Assistant would do this for all the key poses from the animator for the entire scene. They would then go back and add in any major breakdown poses necessary to clearly describe the action from one key to the next. If the action is very subtle, then no breakdown would be necessary and the inbetweens would be left for the inbetweener to complete. However, if the movement had an odd path of action or there was to be some form of smear or strobe, then it would be the Assistant's responsibility to do this drawing.
The Inbetweener would then receive all the cleaned up keys and any breakdown drawings. They would then proceed to complete all the remaining inbetweens for the entire scene.
The number of key poses in any given scene can vary due to the action involved and the length of the scene. Some Animator's will do a drawing every 8 frames or 3 drawings per second. For an average scene which is 4 seconds long, that would be 12 keys. A 10 second scene would have 30 keys. There is no set rule for this as it truly does depend on the action and speed that the character needs to move.
In the example I will be using here, the overall length of the scene is 12 seconds.
There were a total of 105 drawings of the character. There were 13 primary keys and 45 secondary keys and breakdowns. That's 58 out of 105 drawings were roughed out by the Key Animator... that's just over 50% of the drawings or every other drawing. That's pretty extreme and means that there was a lot of action going on that the Animator wanted to make sure was clearly understood by everyone. Is that normal? Not usually.
There was one section of the animation that was "straight ahead" right after he breathes out the fire and scrambles back, which basically means there was no actual "key pose" anywhere in the movement, it just flowed from one drawing to the next. The Animator needed to indicate these drawings in his roughs, otherwise the action could have been misinterpreted by the Assistant.
Here are a couple of rough keys from around the 5 second point.


This is right after the character lands on his head and flips over. It's the recovery of the action.
You can see how the drawings are fairly loose with hands and feet roughed in to indicate position and movement.
It is now the Assistant Animator's job to clean the drawings up and make them look solid and three dimensional. Here are the two clean-ups.


If I superimpose the clean up over the rough you will be able to see the changes that were made to each drawing by the Assistant.
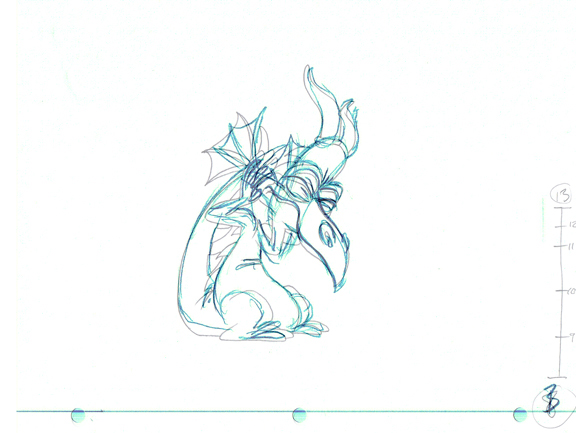
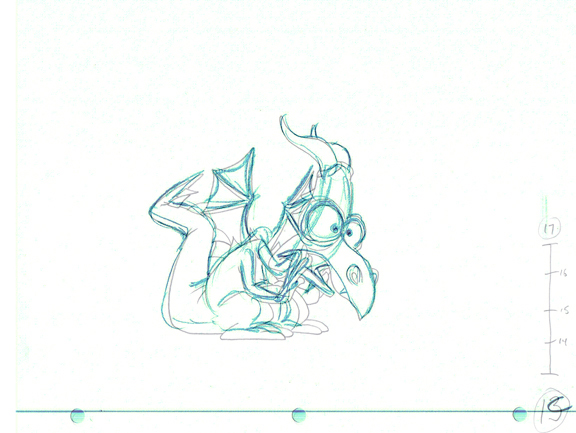
The major changes were to the wing direction and the volumes of the legs, belly and feet in B and in C it was the volume of the belly and feet. Everything else is pretty much the same.
So why would the Assistant take the liberty to make those changes? We'd need to look at the rough key pencil test to find the answers.
Watch this over a few times and see if you can spot the things that need fixing up, specifically in this area. Scroll in the control bar to where key B appears, then using your arrow keys, flip forward and back between key B and C. Can you see how much the character's body shifts? This is something the Assistant would need to fix. In the process of adjusting the character's position, the Assistant probably noticed that the volumes were also changing and made the correction. Now what about the wing change?
If you back up to key A3, you can see that this is the impact key where the character compresses to the ground and then in B the character comes back up. This would require that the wing should be moving back upwards in this drawing and so the curve is drawn opposite to what it was in the rough.
You might say to yourself, "How would the Assistant know this? Shouldn't they assume that the Animator knows what they are doing? Why would they go against the Animator's drawn action?"
The Animator may have just been barreling through the drawings trying to get the action out as quickly as possible, not stopping to make little corrections to secondary actions and overlapping parts. They might have even planned to fix this up themselves after watching the rough pencil test. It might have been the Animator who was the one who pointed it out to the Assistant as he explained the scene. Which ever way it played out, the corrections were made and the animation is stronger because of it. The two Animator's would work as a team communicating what needed to be done. (In reality, this whole thing was done by just one person... me. However, the same theory applies in that by the time I had finished the rough keys, a few days may have passed and I would have needed to make the revisions and so as I rewatched the pencil test, I would have reminded myself of all the things that needed to be fixed.)
Let's take a small step backwards and look at a little test that I gave my students.
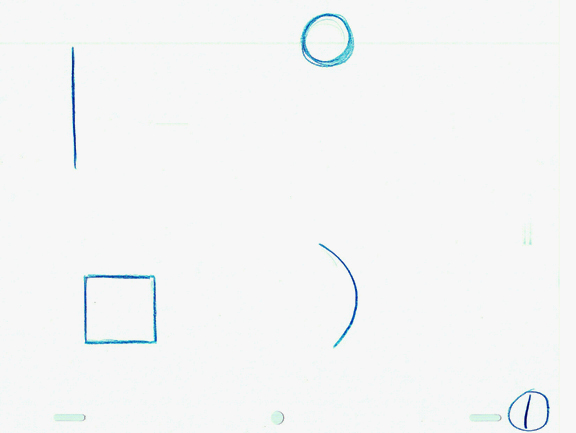
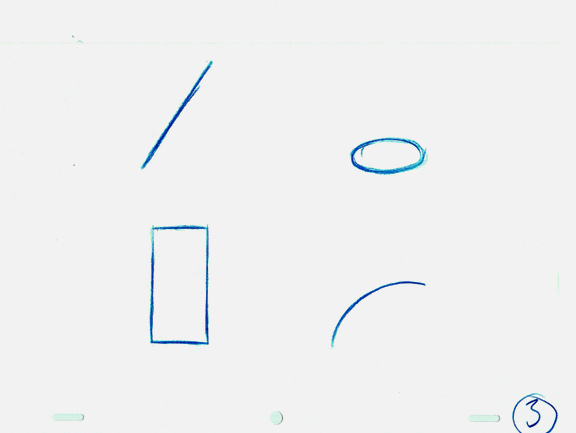
I handed out these two key poses: #1 and #3 and asked the students to do the breakdown inbetween. It took them about 5 minutes to finish them. It was interesting to me that none of the students asked me any questions about what the lines or objects were doing in the animation, they just went with what they thought should be the appropriate inbetween.
Here's what I got from most of them.
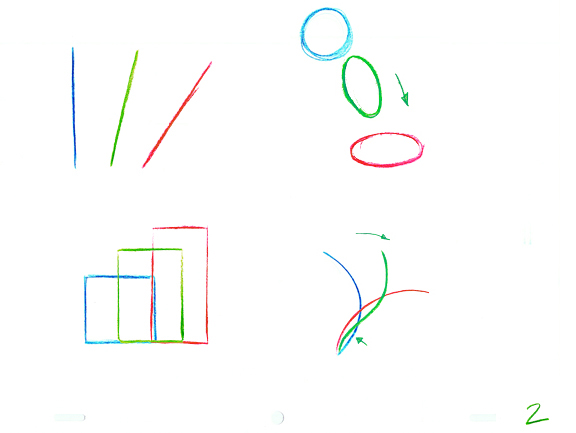
They gave me the standard 1/2 way position on the straight line, the stretched ball from the Descending Energy Ball Bounce assignment, the cube morphing into the rectangle, and the Overlapping Seaweed inbetween. I got pretty much what I expected to get.
I then went on to tell them all the stuff about communication between the animator and the assistant and the assistant to the inbetweener. You need to know what the object, line or character is doing at that particular moment in order to properly decide on how the inbetween should be drawn.
What if, as in the example below, the animator wanted the line to bend and drag, or the ball not to distort on the drop down until it actually impacts the surface. Maybe the cube was supposed to rotate and morph. And the seaweed line was to snap over faster on the bottom and the top move slower and crack at the end.
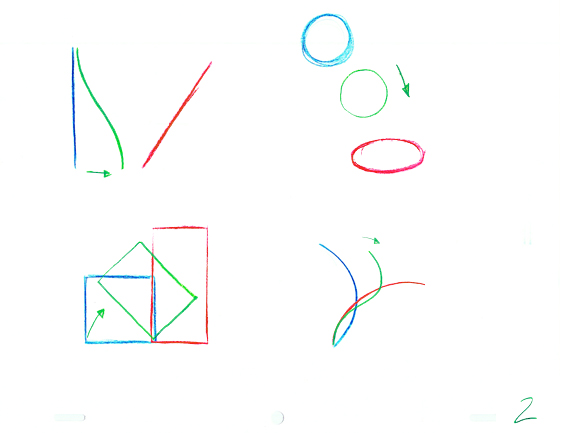
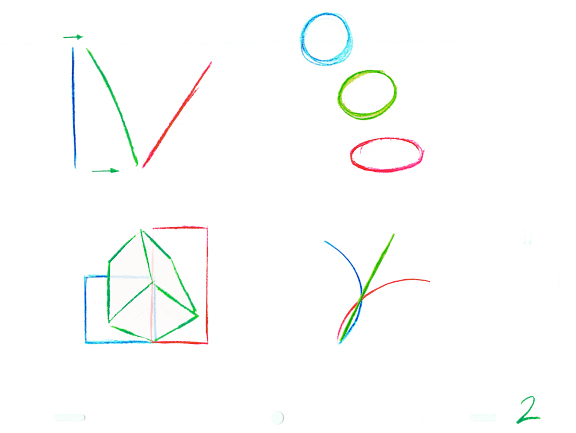
Or, what if the animator wanted the line to stay more rigid but still show overlapping action? And the ball was supposed to "smear" on the way down?
The cube was actually the end of a rectangular box that flipped up three dimensionally? Or the seaweed was actually more like a stiff diving board?
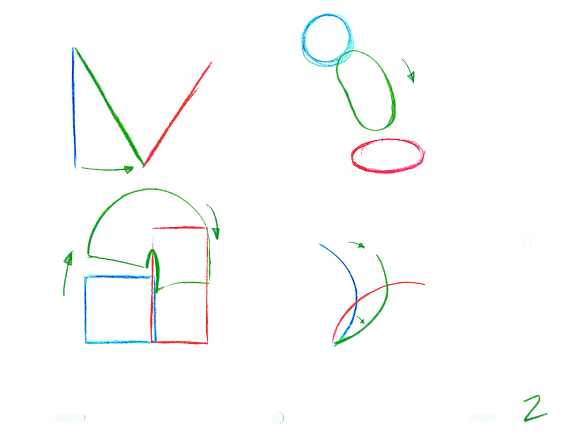
Or, what if the animator wanted the line to stay completely rigid and have more of a mechanical swing? And the ball was supposed to "smear" on the way down?
The cube was to jump and stretch? Or the seaweed was to go beyond the key and then come back?
There are all sorts of different variations that could happen and it all depends on what the object or character is supposed to be portraying at this particular point. My goal was not to "trick" the students and then say, "Aha! I gotcha!" It was to show them that you must always be asking yourself questions... about the motivation, the action, the "why and how" of not only the entire character but also each and every line that makes up the image of the character!
Differences like the one's shown above can alter the audience's perception of the character's physical laws, of how they interact with their environment. Characters like the Roadrunner and Coyote can completely ignore the laws of gravity for certain periods of time but then must follow them at others depending on the circumstances and reasoning behind the gag in the cartoon. Take the cartoon where the Coyote puts together the refridgerator that spits out ice that is ground up into snow that allows him to ski in the heat of the desert, even creating an ice bridge that supports him in mid-air. When the machine stops working and he realizes he's going to plummet to the ground, he unstraps himself. Then it starts back up again and it continues on without him. He hovers in mid-air long enough to see it reach the other side of the canyon and then gravity takes over and he falls.
Once these rules are established, you can start to play around with them a bit. If you've set the audience up with two gags that have the character floating in mid-air for 2 second before falling, on the third, change the timing so it's longer. The audience will expect 2 seconds then you make it 6 seconds. They know it's going to happen, the just don't know when.
There was a similar type of gag idea in a Simpson's episode where Sideshow Bob takes a step forward and a rake pops up and hits him in the face. A gag right out of a 3 Stooges film. He then takes another step forward and another rake, "Thwack!" in the face. This continues of for a full 30 seconds - 9 rakes in all. The first "Thwack" and you chuckle at the timeworn gag, the same for the second and third. By the fifth one you might find it tedious. By the eighth and ninth ones the humour re-emerges, amplified.
I know this isn't directly "inbetweening related", but the general theory is the same.
So back to the Baby Dragon example. Here are two keys from the beginning where the Dragon drops onto his head and bounces over onto his butt.


This is very similar to the test I gave the students, with the box and the rectangle. 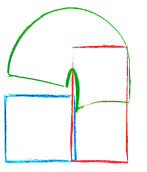
These are the two inbetweens I did to complete the action.


The pencil test showed that the action was so broad and the time for it to happen was so fast, it didn't read clearly on screen, so I added in another inbetween between each drawing and shot them all on ones. This made the action read more clearly.


The main problem here was the missing drawing between 4 and 5 - the apex, or high point of the action. When I only had 4 and 5 the Dragon seemed to pop between the two drawings. Now with 4a, the arc becomes more fluid. I don't usually tend to put a lot of things on ones as it can give the animation a mushy look if you do it too much. You really need to pick and choose where it's appropriate.
Here are three pencil tests showing the same drawings shot on ones, twos, and a combination of ones & twos.
You can see that on ones it's pretty fast. On twos, it's twice as slow, and the combination of ones and twos is in between. In this case it wasn't a matter of which looked best, it was a matter of how much time does the audio track allow me? There is the first sound of his head hitting the ground and then the second when he lands on his butt. For this cartoon, you weren't allowed to alter the sound in any way. I couldn't add in 5 frames between the two hits, so I had to time it right to the two sounds exactly. There were 7 frames between the two sounds and I have 7 drawings. Therefore, I have to shoot them all on ones.
When you look at the pencil test on ones and compare it to the final color film, it seems like that part is slower in the final version. The reason for that is that color tends to slow things down slightly. When you look at a pencil test with just the lines and white paper, you see lines moving around. In color, you see masses moving. The color masses take up more space than the lines and so it appears that they're moving slower. Compare this color version of the drawings shot on ones with the pencil test. Notice the difference?
On key 6, you may have noticed the inbetween #7 is indicated as a "favour". Favour is the term used (sometimes it's the word "cushion") to indicate that the inbetween is not in the half way position - half the distance between the two keys. The favour changes the spacing between the drawings to create a mini slow-out or slow-in to an action. It can make the movement appear less abrupt. In this case, I didn't want to slow the movement down by putting in a half and then a quarter to slow-out of the key, so I just put in the single inbetween with a favour. You might say to yourself, "Yeah, but it's only one drawing!", true, but it's still 1/12th of a second, and that extra 1/12th of a second can make a difference.
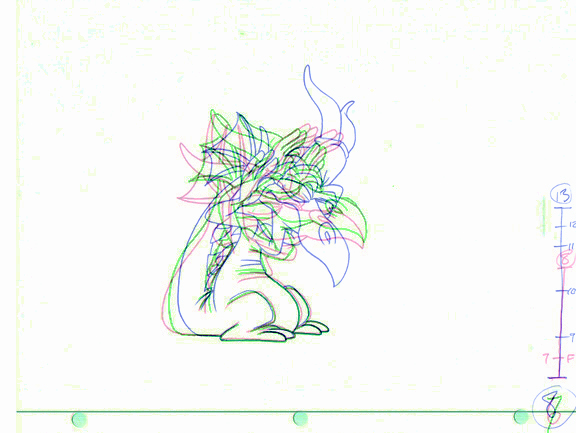
I know it's difficult to see through all the spaghetti lines here but these are the three drawings over top of each other. 6 is red, 7 (the inbetween) is in green, and 8 is in blue.
Here's a pencil test of the three drawings flipped slowly.
Now I could have still done the half and quarter inbetweens but just shot them on ones and the end timing would be the same as the single favour shot on twos. Again, it's a matter of two different things: 1) by just doing the single inbetween, I saved myself the amount of time it would take to do the other inbetween, about 10 minutes of drawing. 2) shooting it on ones might have given too much drawing for that action and made it slow down slightly. If I had all the time in the world to do it all on ones and then after shooting it all decide to take out some of the ones and shoot on twos until it looked just the way I wanted it to, I might do it that way, but everything has a schedule and a budget. If you have a ton of time and money, go ahead.
Now from 8 to 13 I have 4 inbetweens with a slow-out into 13. 10 is the half with 9 and 11 quarters. 12 is the slow-out drawing.
There has been a long running debate over what to call a slow-in and what to call a slow-out. There are two ways to look at it. You can slow-out of a key and slow-in to a key, or you can slow-in to an action or you can slow-out of an action. A key is the start or stop point. An action is the movement of the drawings. It doesn't really matter which one you use, they ultimately mean the same thing.
For some animators, if you have a timing chart that looks like this:

You could be slowing into the action... or slowing out of the key #1.
If you have a timing chart that looks like this:

You could be slowing out of the action or slowing into the key #4.
It's really all just a matter of your point-of-view.
Indicating a slow-in or a slow-out is simply for the purpose of not having the action stop abruptly. I always use the analogy of driving a car. When you step on the gas, you are not instantly going 100 km and hour. The G-forces involved in that type of sudden acceleration would likely kill you. The car needs to build up speed gradually until it finally reaches it's constant rate. The same is true if you were going 100 km an hour and you stepped on the brakes, you do not stop instantly. It would be the equivalent of hitting a brick wall. So, you apply the brakes and gradually come to a stop. Even if you slammed on the brakes you would stop faster but it would still be a gradual deceleration.
This is part of what timing is all about. Understanding how long it takes for things to happen. This comes from experience and observation. Sometimes you need to be extremely analytical about it and use a stopwatch or video recorder then count the seconds or frames that an action takes. You might choose to be realistic and use the real timing or choose to exaggerate the timing to make it faster or slower.
Sometimes you might have a very fast action and very little time to show it. This is where we enter the realm of visual cheating.
On the bounce, I didn't have a lot of time - 7 frames. This gave me 7 drawings maximum to work with. 7 drawings is actually quite a lot. What if you only had 1 or 2 frames to move something? That would only give you a maximum of two drawings. If this action also had to travel a large distance you could run into the problem of strobing the drawings. This is a visual effect that causes the drawings to look as though they are suddenly appearing and then disappearing on screen. In the case of the Baby Dragon animation, I had a few opportunities to try to deal with this very problem.
The first was just before he blows the flames out of his mouth.
This was my start pose:

And this was my end pose:

I had to turn the character's head about 110 degrees back in just one frame.
If I had done an exact half inbetween the head would have looked like this:
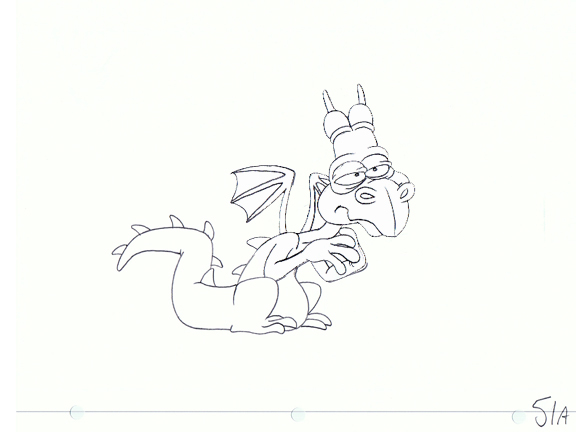
And the resulting action would have "popped" or strobed on screen, looking like this:
You can see how the head turn seems to jerk a bit more than in the smear.
In order to avoid this, I needed to fill in the space with more of the character's head, so I resorted to a trick called a "smear" drawing.
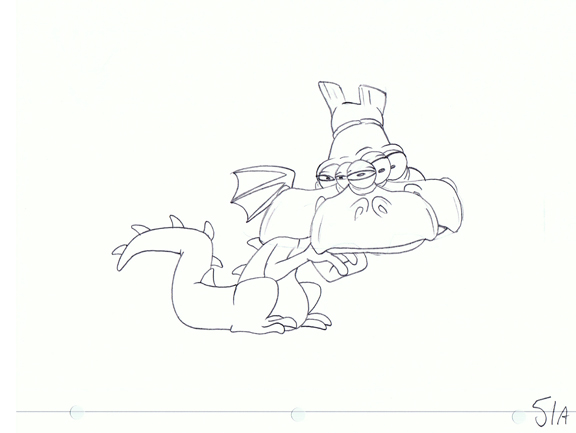
This is where you stretch the volume of the character to fill the space between the start position and the end position. In this instance, I also strobed the eyes and beak a bit creating what looks like 4 inbetweens all on one drawing. This is how it looks in color:
I could have made the drawing even more of a complete smear by drawing it like this instead. That's a bit more freaky looking though.
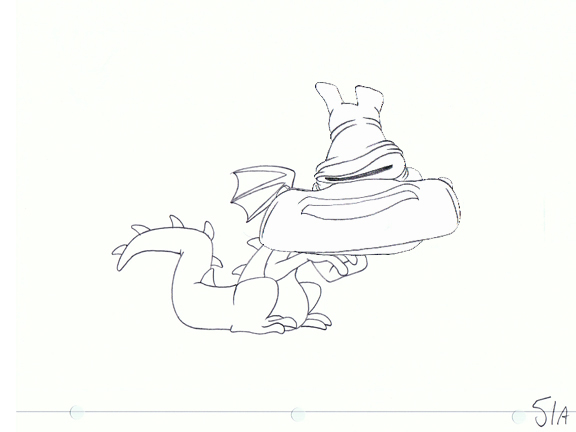
And now that I look at it here, I think this would have been the better inbetween to put in.
O.k., are you feeling a bit overwhelmed with this information? There's some pretty complicated stuff going on here. I'm not trying to scare you off, just giving you a taste of where you need to be eventually.
Let's take a few steps back and work with some fairly simple exercises to get warmed up and introduce you to the principles.
We'll begin with a job description for the inbetweener/assistant animator. As I mentioned earlier, it's the inbetweener's responsibility to provide the bulk of the drawings in a scene. Let's say the average length of a scene is 4 seconds, that's 96 frames and if you're shooting the animation on twos, it would require 48 drawings. If the animator provides 12 keys, that leaves 36 inbetweens for the assistant/inbetweener. That means the animator does 12 roughs which are then cleaned up by the assistant (in most cases, none of the key animator's drawings ever make it to the screen) that's 1/4 of the scene, leaving the remaining 3/4 to the inbetweener. In a half hour television cartoon (which is actually only 22 minutes long), the inbetweeners are responsible for 16 1/2 minutes. On a feature film that is 90 minutes long the inbetweeners have done an hour and 7 1/2 minutes of it. That's a lot of drawing responsibility. That's why at the end of a film, you might see about 10 key animators and 50 inbetweeners (whose names are mysteriously in a smaller font and on screen for a much shorter period of time).
Main Things An Inbetweener Must Consider
Action
Is the inbetween drawing in the right place?
Does it follow the proper path of action? Does it follow the timing set out by the animator? Does it require special spacing to accomodate for any overlapping action or a weird path of action?
Not every inbetween is an exact "half". There are special exceptions - do you know what they are?
Volume
Is the volume consistant with the volume being shown in the two keys?
The character can't shrink and grow from one drawing to the next (unless it actually has to expand or contract or jitter for a special reason). Many people just starting out think that inbetweening is just moving a bunch of lines around. It's not! Animation is all about moving volumes and masses in three dimensional space. Even though you are drawing on a two dimensional plane (either paper or drawing tablet) you must consider the third dimension of depth... unless your designs are specifically set up to only move in two dimensions (up and down, and left and right), but even then you need to maintain consistant volumes.
Line Quality
Does it match exactly with the keys and all the other drawings in the scene?
Altering the line quality from one drawing to the next will cause the image to "boil and crawl". Again, unless your design style is to do this on purpose, you want the audience to be looking at the character's acting and not the fact that they have worms crawling all over them.
We'll come back to these points again in some of the examples and assignments later.
So, how does the inbetweener control these things?
The simple answer is: by flipping the drawings as they do the inbetweens.
Flipping
Flipping is the physical process of moving the drawings in your hand in order to create the optical illusion that they are moving. Watch the following videos to see me demonstrating the flipping actions, then come back.
Inbetween Flipping Video (30 seconds)
Stack Flipping Video (30 seconds)
A more involved demo & explaination of flipping (6 min long)
The inbetween flipping method is the one used while actually drawing the inbetweens. I always enjoy my very first class with my 1st year students. This is where I introduce them to some of the basic principles of animation and I have them do a very simple inbetweening exercise. I love seeing them try to do the inbetweening action for the very first time. It's not easy and they look extremely uncomfortable and awkward. I tell them to remember this moment in time so that when we finish the first semester and they are all pros at flipping they can look back with fondness and remember where they came from.
Aside from the coordination aspect, you need to train your eyes to ignore the movements of your hands and the papers and focus only on the lines that are moving on the paper. You need to see each individual line as it moves from one point to another as well as the overall mass that the lines represent. Being able to see this movement and then place the line in the appropriate position is what make the inbetweener so valuable to the process.
The number one complaint that most animator's have about an inbetweener is that they don't flip the drawings enough as they do the inbetweens. The flipping process is your personal pencil test. Every line you draw, every connection point on two lines, every end point must be flipped to be sure it's accurate. As you flip the drawings, you look specifically at a single point on a line and your eye tracks that point from one key to the next, seeing where it's going from and to. Once you know what the path of action is and understand the spacing required, you begin to draw the line and flip the three drawings to now see the movement of the point. If that point deviates from the path of action - it's wrong. If the point is improperly spaced - it's wrong. As you flip the drawings and you see that it's wrong, you must correct the mistake. If you don't, you're either being lazy or irresponsible. Both of these excuses are you simply being unprofessional. If you want to do this for a living, you must act professionally and take pride in your work. If you don't, you won't be a professional for very long and the only flipping you'll be doing in the future will be for a fast food restaurant.
Some Really Basic Rules for Inbetweens
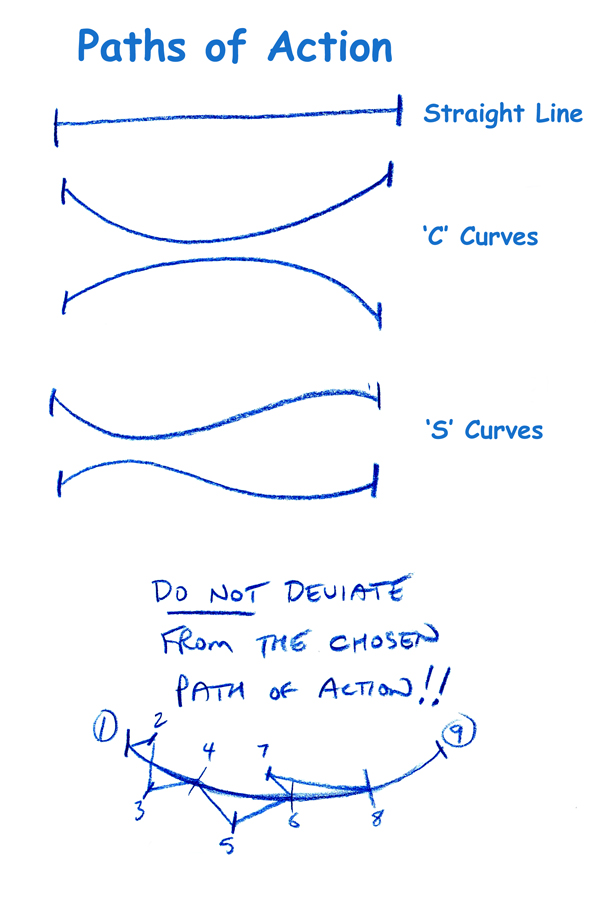
This might be a slight simplification, but if you start with these two simple sets of rules, you'll have a pretty hard time goofing up on your inbetweens.
 .
.
You really only have three options when it comes to a path of action for any point on a line or the line itself: Straight, 'C' Curve, or an 'S' Curve. Once you have chosen the appropriate path of action, you must stick with it!! You can't deviate from it, no matter what. If you do it will cause the point or line to jitter.
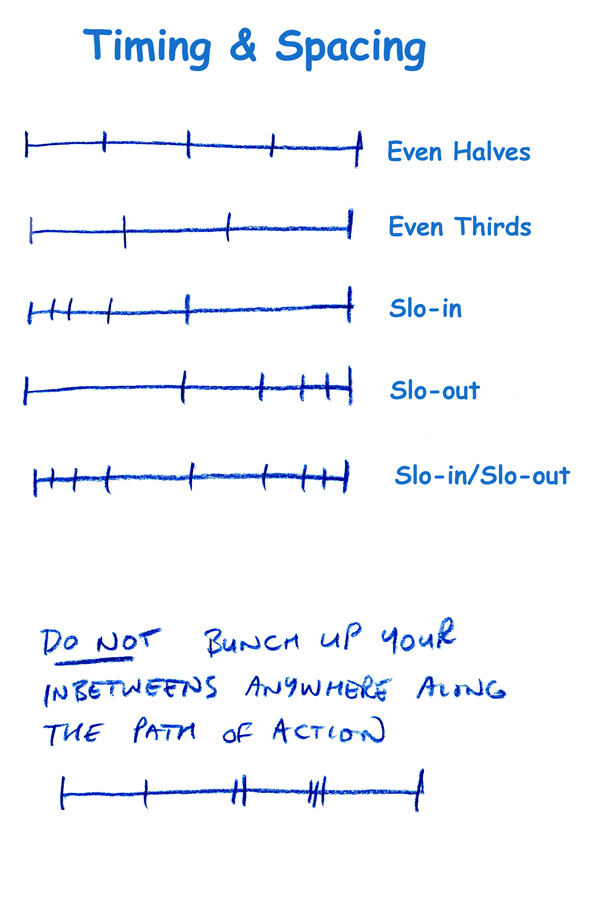
Your timing and spacing is also very limited in that you must stick to Even Spacing. By this I mean all your inbetweens must be either halves or thirds and occasionally the odd favor or cushion into or out of a key. Remember, that a cushion is not the same as a slo-in or slo-out in it's spacing.
Also remember that there are special circumstances where a half is not necessarily and exact half way position as in overlapping actions.
You can't bunch up your inbetweens in the middle of a path of action as it will cause that part of the character to stall and possibly jitter.
Again, if you make either one of the errors shown above - it means you weren't flipping the drawings and looking where you were drawing the line - you weren't thinking as you draw. That's the primary overall rule: "THINK WHEN YOU DRAW!"
Who is in control of the pencil?